Don't have Smartsupp account yet? Sign up for free in just 2 minutes.
Install Smartsupp live chat
Search for Smartsupp on Google Play, install and open it. Requires Android 8.0 or later.
Tip: Smartsupp can also run on tablets and iPads.
Log in to Smartsupp account
If you do not have Smartsupp account, you can create a free account. If you already have one, then just use your Smartsupp Email and Password, or sign in with Google.
Settings and Profile
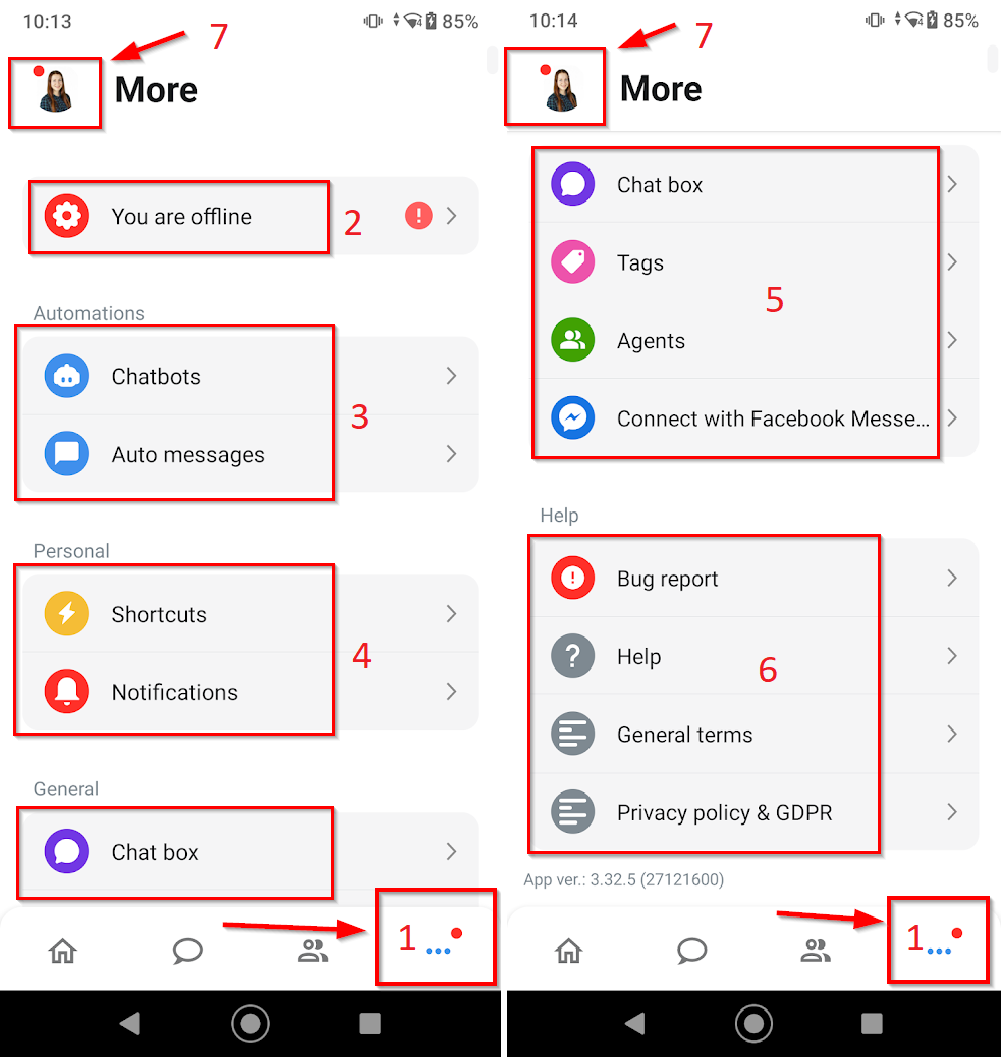
Click on the Three dots ("more") (1) icon in the bottom right corner where you can set up the basic behavior of the chat. You can see and change your Online/Offline status (2), settings of Chatbots and Auto messages (3), create new Shortcuts, set up your Notifications (4), and in general, manage your Chat box, Tags, Agents, or connect Smartsupp application with Facebook Messenger (5). You also find here a Bug report, where you can report any bug, Help articles find tutorials on how to use different features, and it’s also possible to access General terms and Privacy policy & GDPR (6).
In the Profile (7) section, you can update your Profile (1) (Name, Description, Email), Groups (2) and you are able to manage your Subscription (3). Below you can manage your current Online/Offline status (4), or set up Notifications when offline (5). You can also see a basic statistics overview, like a number of Conversations or Rating (6) for the activity in the last month. You can choose the app Appearance (7) (Light/Dark mode), you can Change your password (8), or Log out (9).

SmartHub Statistics
You can find SmartHub Statistics in the left-bottom - the "Home" icon (1). When you get to this page, in the top right corner, you can check a quick overview of Limits (2) of Conversations, Chatbot, and Chatbot conversations. Those limits are based on your current plan and are calculated per each calendar month. You have all new notifications and product updates displayed under the "Bell" icon (3).
In SmartHub, you can see statistics for:
-
Conversations
- Total conversations (4) - the number of conversations for the selected time period. Includes open and resolved conversations and chatbot conversations.
- Average rating (5) - average rating you get in the selected time period.
-
Chatbot
- Triggered (6) - the number of chatbots that were sent to your visitor.
- Chatbot conversations (7) - The number of conversations for the selected time period that the chatbot started, joined, or resolved. Multiple chatbots can participate in one conversation.
Statistics can be filtered by clicking on the date range on the right site: the Last 7 days, Last 30 days, and Last year.
There are also Help articles "Suggested for you" (8) at the bottom of the page.

Conversations
To be able to chat with your visitors, you have to be available, which means that you have to go online. Go to your Profile (1) by clicking on your picture in the top left corner and set yourself online.
In order to chat with your visitors, you have to move to Conversations (2) - the "chat icon" at the bottom of your screen. You can see all ongoing chats here. If you need to access older or resolved conversations, just click on the Resolved (3) - the "done" icon on the top right corner.

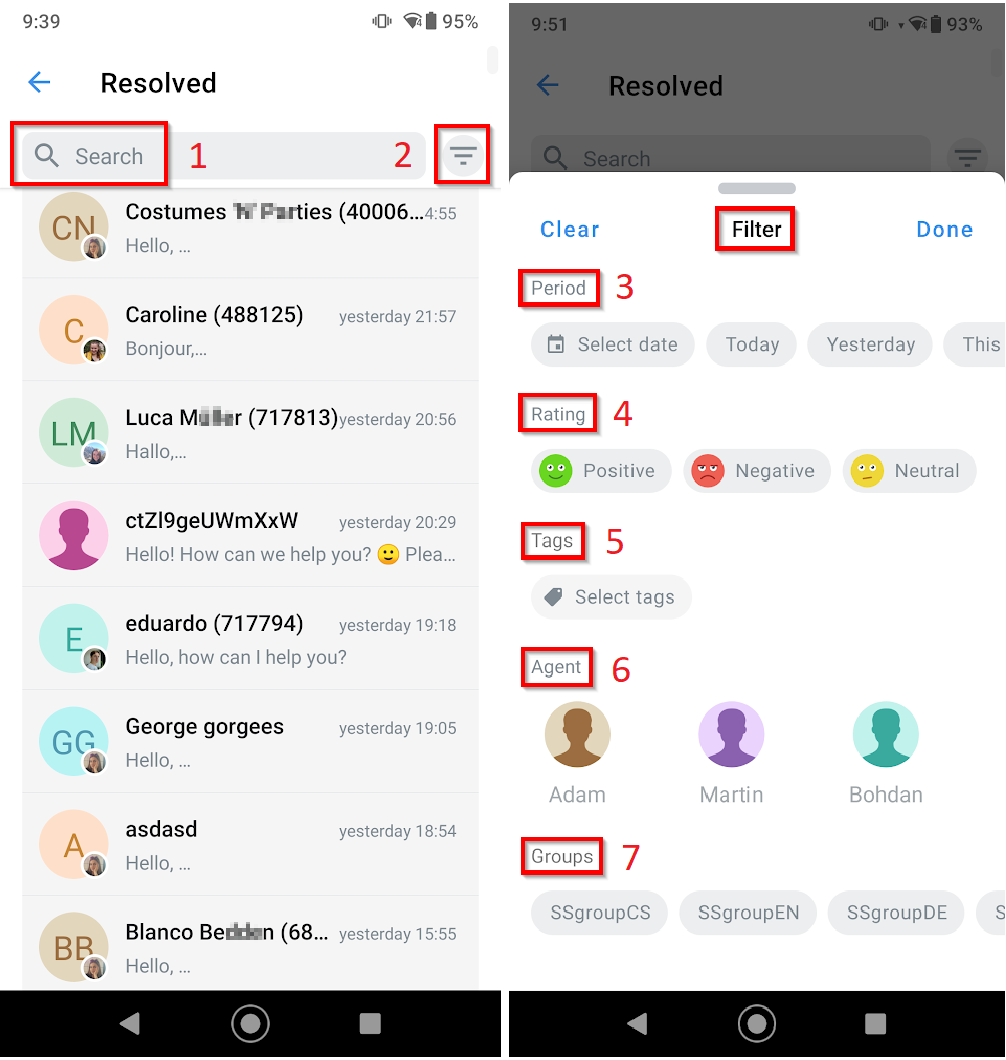
Resolved conversations can be further Searched (1) or Filtered (2) by clicking on the icon in the top right corner. You can filter your conversation by Period (3), Rating (4), Tags (5), Agent (6), or Groups (7).
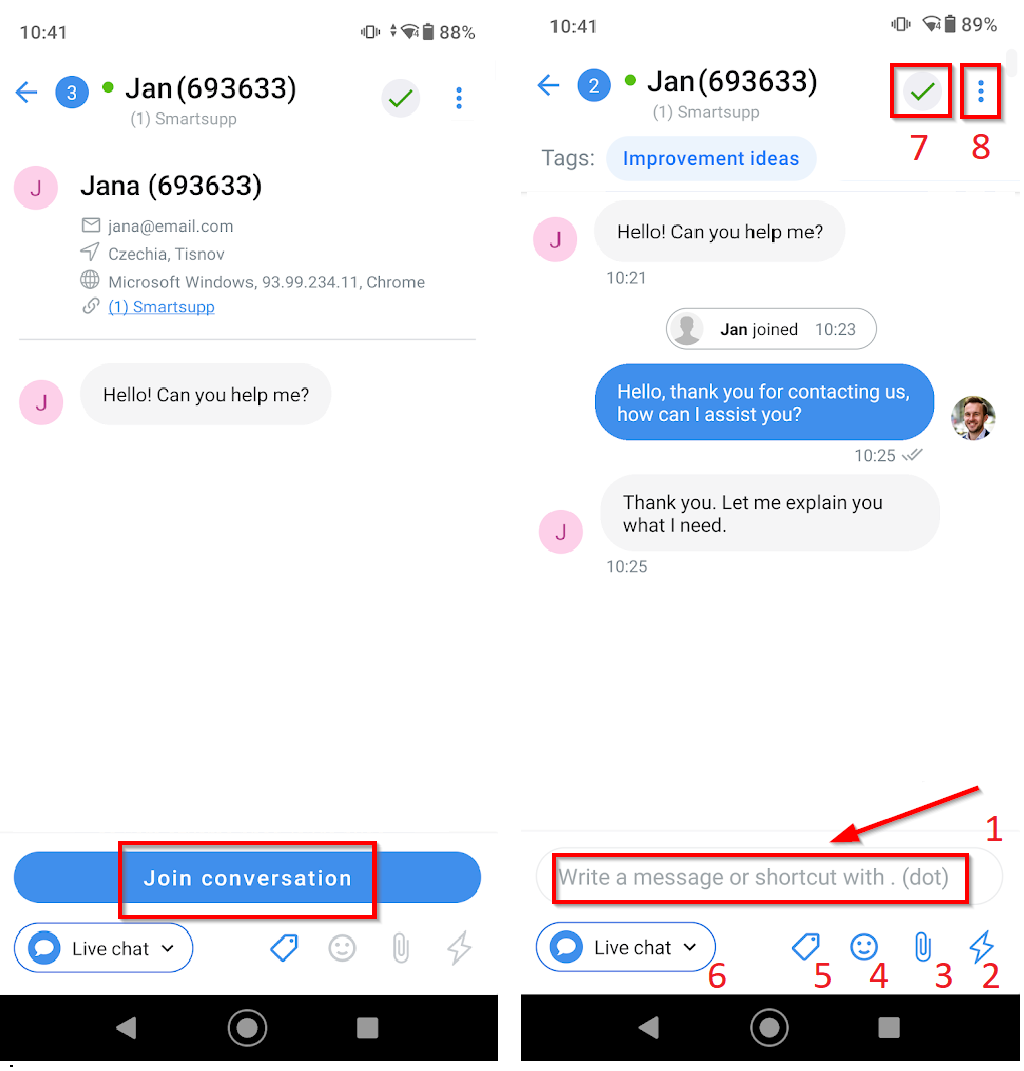
You can easily answer your visitors. Join selected conversation by clicking on the button "Join conversation". To answer your chat, type a message into the Text area (1). To speed up the conversation, you can use Shortcuts (2). Note: you can also add a shortcut by typing dot (.) directly in the text. You can also add any Attachment (3), Smiley icon (4), or you can Tag (5) your conversation. You can also choose if you want to answer in the Live chat or Email (6). When the conversation is done, you can Resolve (7) it. If you click on the Three dots (8) in the top right corner, you can manage more information about the visitor.
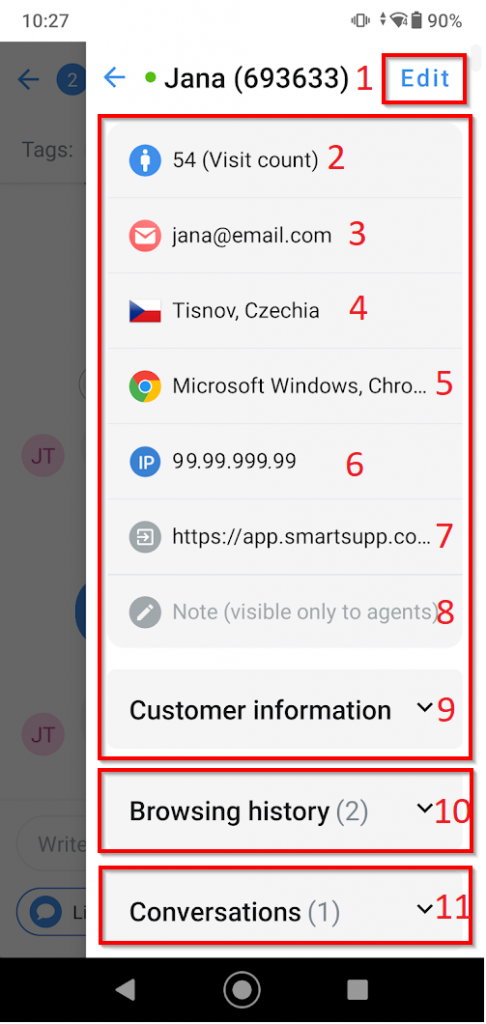
Under the Three dots (8, screenshot above) you can display or edit your visitor information. By clicking on Edit (1), you can manage the visitor's name, Email, Phone, Note, or Block the visitor. Further, you can read information about the total Visits (2) of the visitor, visitor's Email (3), visitor's Location (4), visitor's Browser (5), and visitor's IP address (6), you can see the website where your visitor came from (7) and also add any Note (8) visible only to agents, and you can display Customer information (9). Then you can learn more about the visitor's Browsing history (10) and display all previous Conversations (11) with the visitor.
Visitors
In the Visitors (1) tab, you can see all of the people who are actively browsing your website. If you click on any of those visitors, you can contact them (2) directly via chat or via email. You can also see and edit visitor information (3) (described above under Conversations).
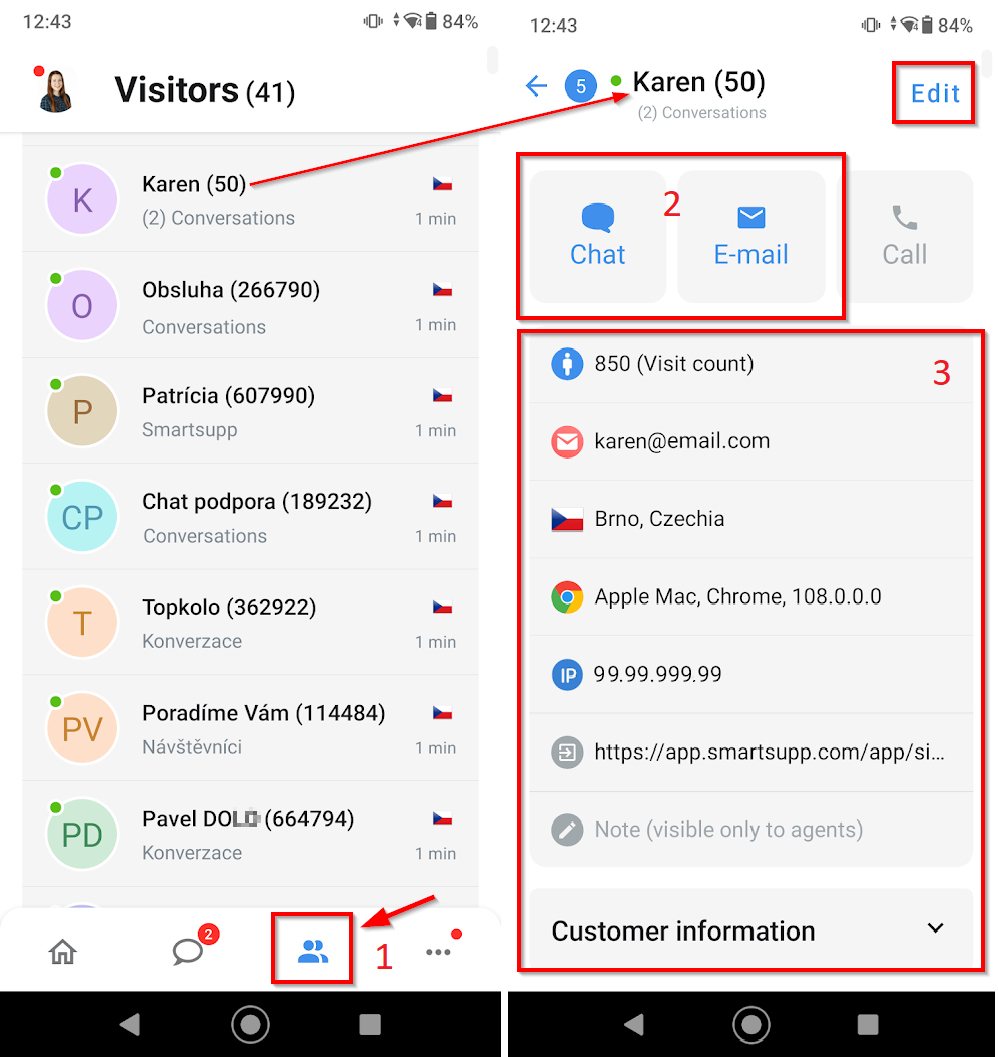
Warning: You might notice that there is a difference between the number of visitors on the desktop version and on the mobile app. This is because only active visitors are visible on the mobile app and inactive visitors are not displayed. This was done to optimize the speed of the mobile app.
Android notifications settings
You may need to allow notifications in Android settings. This is the tutorial on how to do that in Android 9 (Android One version). Go to Settings > Apps & Notifications (1) > find and select Smartsupp (2)
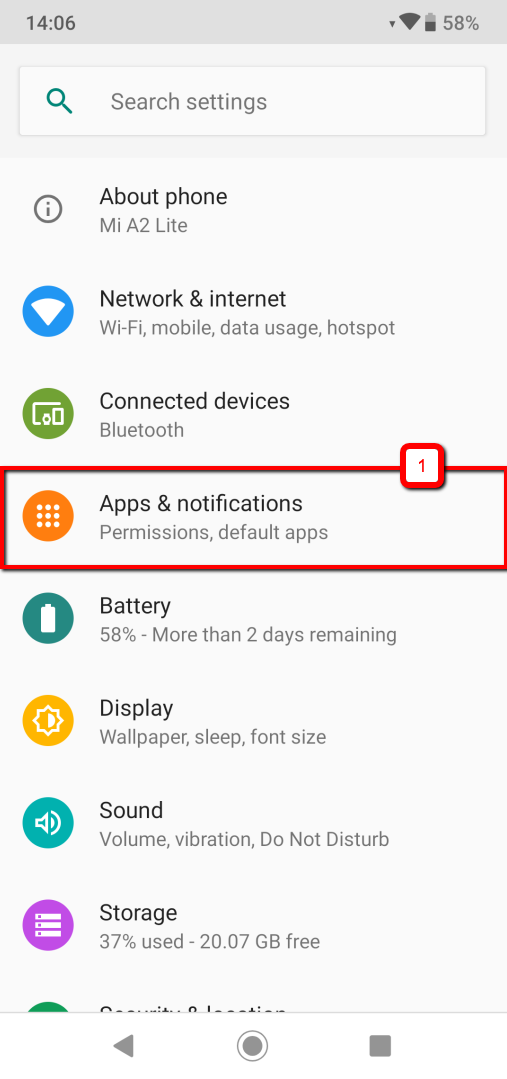
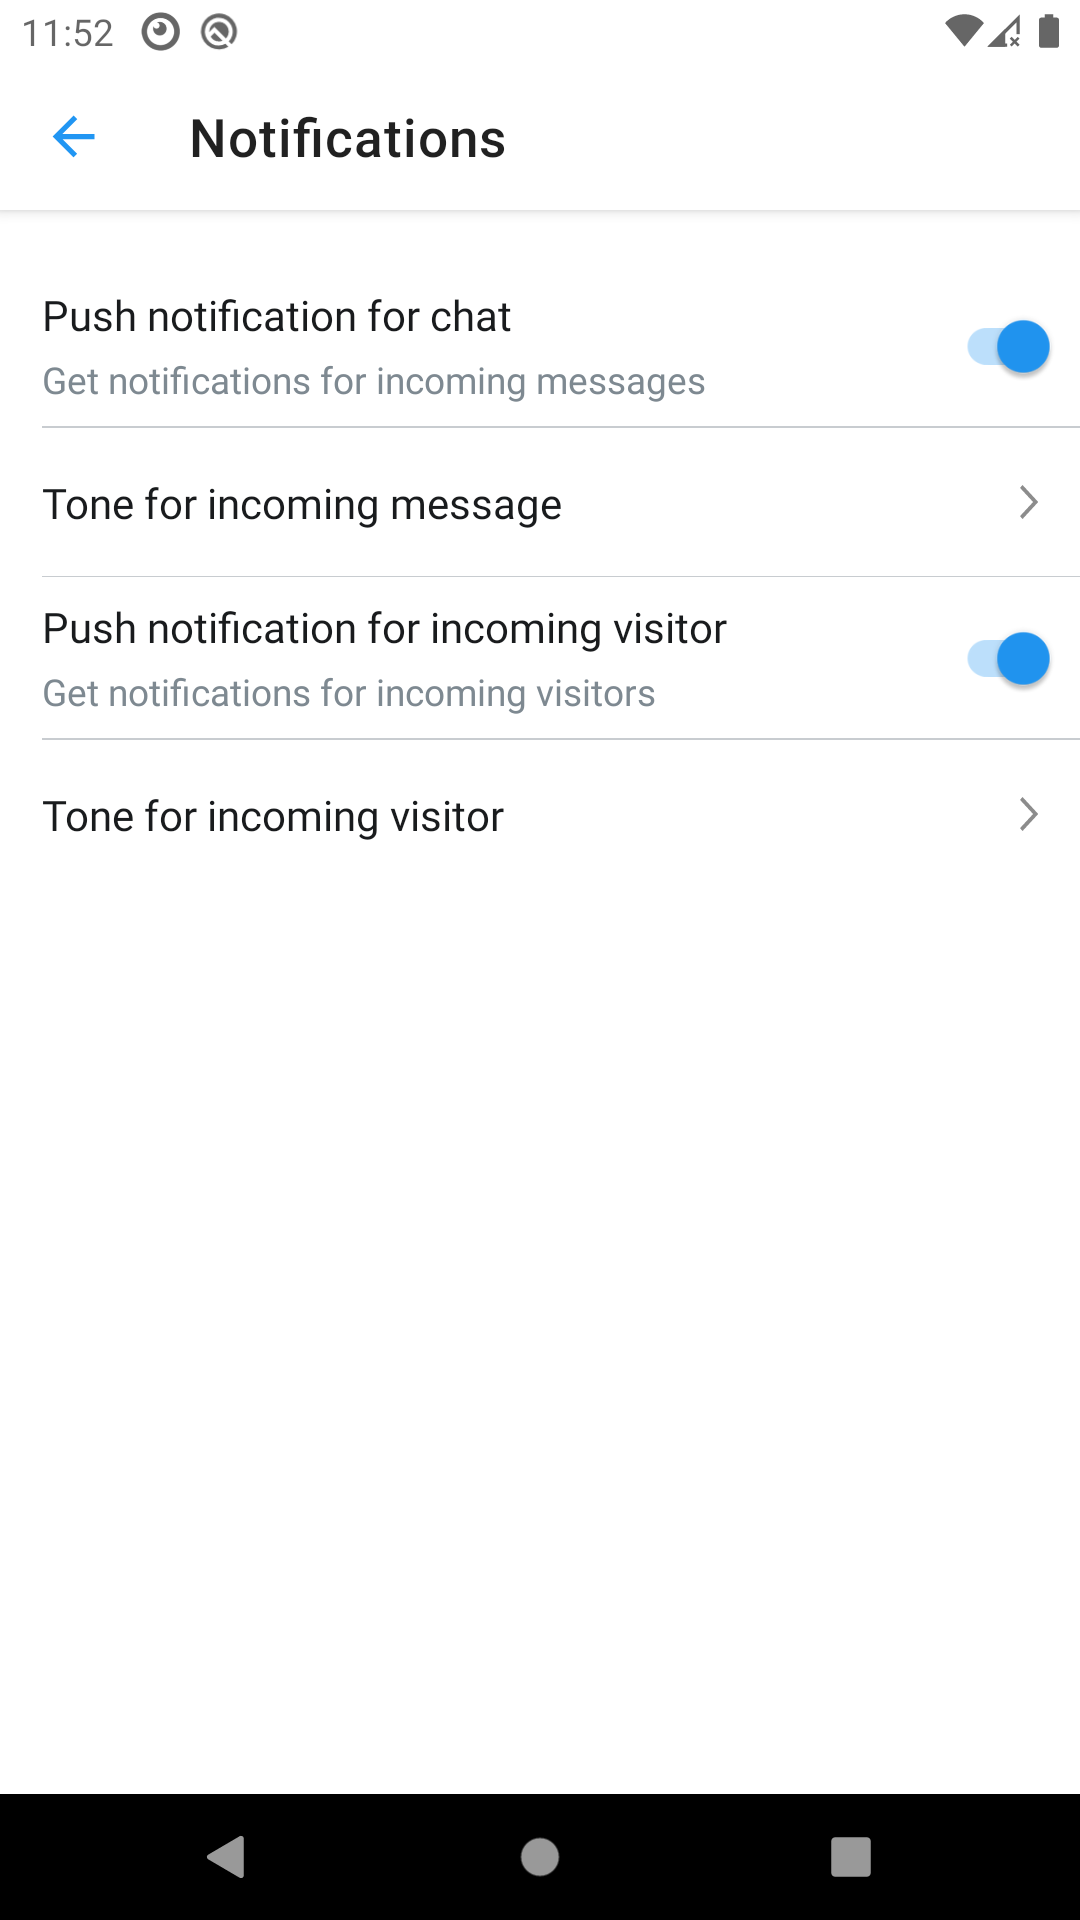
Click on Notifications (3) and enable the option to show notifications (4). Once enabled, you will receive notifications in all of these cases:
1) Smartsupp app is open,
2) Smartsupp app is closed (running in the background),
3) phone screen is locked.
If the notification is off, notifications will not arrive.
Android battery optimization settings
Disable battery optimization for Smartsupp to avoid problems with notifications. Go to Apps & Notifications (1) > Smartsupp (2) > click on Advanced (3)
Click on Battery (4) > Battery optimization (5) > select All apps (6) > find and click on Smartsupp (7) > choose Don't optimize (8) > click on Done (9)


Well done! Now you have all you need in order to chat with your visitors.
SDK mobile application please find the documentation here. This feature is available in Ultimate package.